Start QuickBooks before using QODBC
Once the FLEXquarters QODBC Driver for QuickBooks has been successfully installed onto your computer, you can begin to use it immediately using the FREE "once off" 30 Day QODBC Server Edition Evaluation mode.
To start using QODBC, you first need to run QuickBooks on your computer logged in as an Administrator and open your company file, or one of the sample company files that came with QuickBooks, as shown here. This is for security reasons.


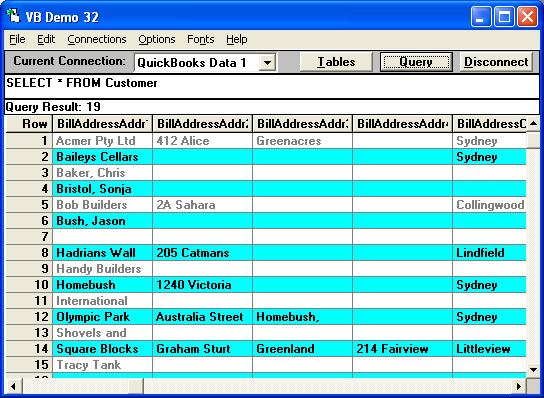
Running VB Demo
Leaving your QuickBooks company file open, click on "Start" and "All Programs" and locate the "QODBC Driver for QuickBooks" program group on your desktop.
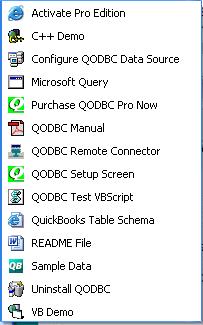
Click on the VB Demo icon to launch the Visual Basic Demo program supplied with QODBC.
To establish a connection: From the menu bar select "Connections" / "Add a new connection", select the "Machine Data Source" tab and "QuickBooks Data" System DSN, Click "OK”.
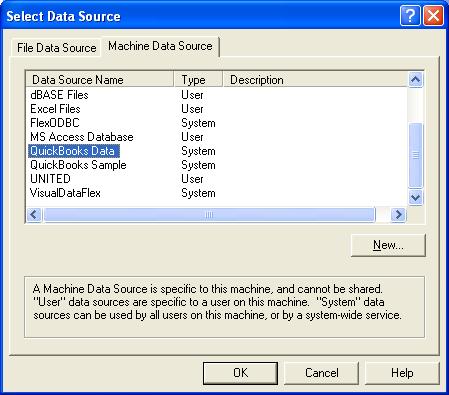
This will connect you to the current company file opened by QuickBooks after you click “OK”.
Troubleshooting Your Connection
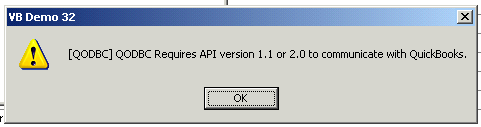
If you receive a QB Open Connection Failed error like this :-
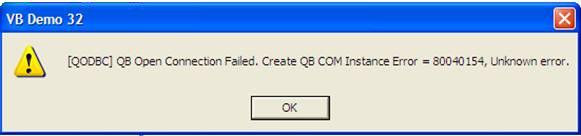
when connecting to QuickBooks, it's possible that something has undone your QuickBooks COM registrations (like installing a previous version of QuickBooks). You can try downloading registerall.zip and running the registerall.VBS script contained in the zip file. This will re-register all the COM .DLLs in the QuickBooks directory for you. Once that's done, retry connecting.
If that doesn't work, you can trying running the "reboot.bat" file in file in the c:\Program Files\Intuit\QuickBooks Premier folder. Just locate the file in Windows Explorer and double click on it to execute it. This will reset the all the QuickBooks COM objects.
Finally, if that doesn't help try re-installing QuickBooks, this should have even the most difficult installations going.
Or if you receive a QB Begin Session Failed error like this :-

You have to authorize QODBC to login to QuickBooks automatically. To do this you must restart QuickBooks and log in as an Administrator and then follow the instructions below.
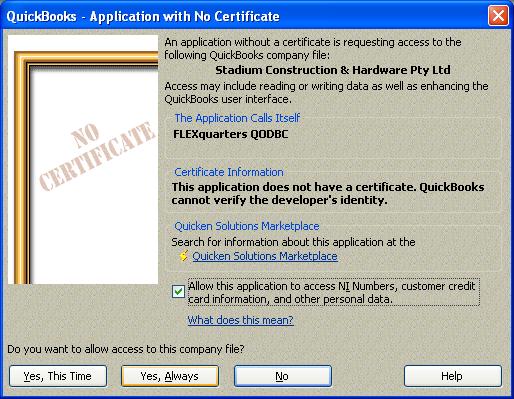
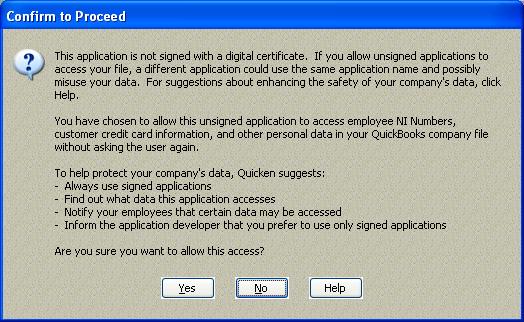
QuickBooks Integrated Applications with No Certificate
When QODBC starts, QuickBooks will ask you permission for this driver to access your QuickBooks data. Check the "Allow this application to access NI Numbers, customer credit card information, and other personal data" options and answer "Yes, Always” to this and the QODBC driver is added to the Integrated Application list.
If you're using QuickBooks 2006 in multi-user mode, you can also select the user account QODBC should use:-
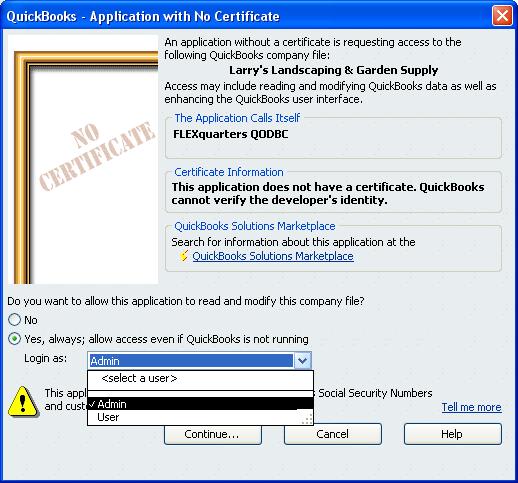
Confirm that you want to allow this access by clicking on "Yes". This will allow applications to integrate with QuickBooks data when QuickBooks is running on the desktop.
Allowing Applications to Login Automatically
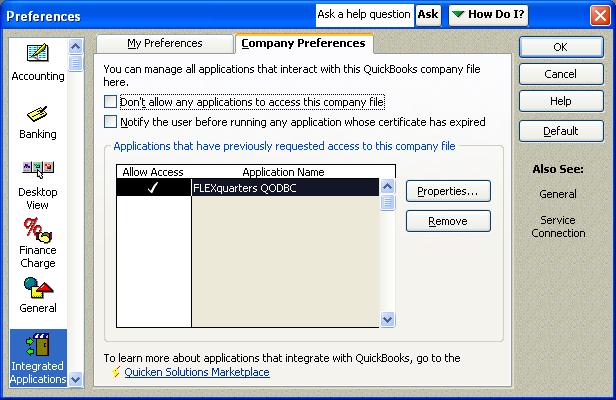
From the QuickBooks Edit menu, select Preferences, and then select Integrated Applications. There are often instances in which you want an integrated application designed to share data with QuickBooks to access QuickBooks files automatically, without user intervention. This might permit, for example, a particular application to run during the night when there is no other activity on the company file. Also QuickBooks doesn't need to be running in the foreground for ODBC compliant applications to access the data files using QODBC while set in this mode.
 |
Click the Company preferences tab and make sure that the "Don't allow any applications to access this company file" checkbox isn't checked. |
|
The "Notify the user before running any applications whose certificate has expired" checkbox can be checked. If it is, however, automatic access will be suspended if the application's certificate expires. |
|
Select the "FLEXquarters QODBC" driver you want to run automatically and click Properties. |
|
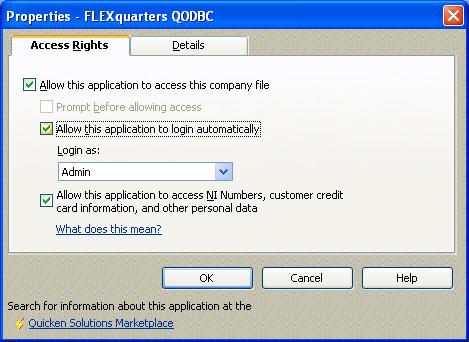
Check "Allow this application to access this company file." |
|
Uncheck "Prompt before Allowing Access." |
|
Check "Allow this application to log in automatically." |
|
Select your "Login as" user. (Normally "Admin") |
This procedure needs only be done once for each QODBC application to be able to connect with the QuickBooks data from any other ODBC compliant application in the future.
Note: If you plan to modify the files, you will also need to choose “Multi-User Mode” from the Files menu in QuickBooks to allow this.
Testing Your Connection
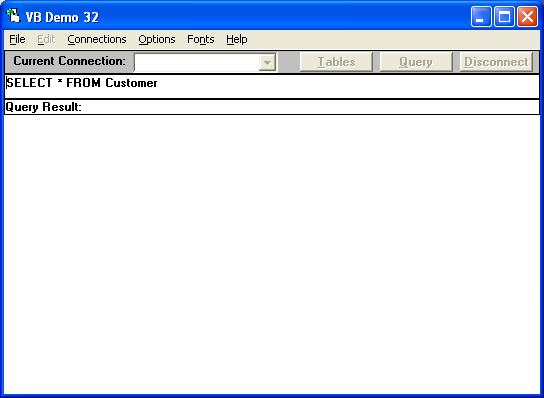
Now that you have successfully established a connection to your QuickBooks data, it's time to type in your desired SQL query, for example your can use the default "SELECT * FROM Customer" or type in another table like stock by entering "SELECT * FROM ItemInventory". Click on the "Query" button and the requested query results will appear! In case you're wondering, the * in the select statement means all columns in that Table.
Alternatively, click on the "Tables" button to see a list of all the available QuickBooks tables. To disconnect, you can either select "Connections" / "Remove the connection" or Click the "Disconnect" button.
Goto: "How do I setup the QODBC Optimizer? Where are the Optimizer options?" for the next step.
|